Hardware Support: DCC++
Overview
Note: DCC++ is no longer updated or supported by the DCC-EX development team or the original author.
It has been replaced by the EX-CommandStation by the DCC-EX team. although it will continue to function with JMRI.
However it is recommended by the DCC-EX team that you upgrade DCC++ systems to EX-CommandStation, which will work on the existing hardware.
DCC++ is an Open Source Arduino-based Do-it-Yourself DCC
Command Station.
Note: DCC++ is a separate project from JMRI. If you have questions about building a DCC++ system, operating it, etc, you should get help via the DCC++ TrainBoard thread and the
the DCC++ Documentation TrainBoard thread. There's also information on the DCC++ GitHub repository and associated documentation and the DCC++ Trainboard discussion. The DCC-EX team no longer provide any support for DCC++. The JMRI discussion groups can only provide limited support for DCC++ itself.
Features include:
- Fully compliant with NMRA DCC standards
- 2-byte and 4-byte locomotive addressing
- Simultaneous control of multiple locomotives
- 128-step speed control
- Control all cab functions F0-F28
- Activate/de-activate all accessory function addresses 0-2048
- Programming on the Programming Track
-
- Write configuration variable bytes
- Set/clear specific configuration variable bits
- Read configuration variable bytes
- Programming on the Main Operations Track
-
- Write configuration variable bytes
- Set/clear specific configuration variable bits
- Control DCC turnouts and sensors
- Directly access and control Arduino IO pins for accessory functions and sensors
Supported Hardware
Command Stations
Currently DCC++ Base Stations can be built from either the Arduino Uno or Arduino Mega
platforms. JMRI should support either platform via USB or Network connection.
Computer Interfaces
Currently, four interfaces are supported:
- Serial/USB: Direct connection to Arduino via a USB cable
- Simulator: Simulated Base Station for off-line operation and testing.
- Network: TCP/IP connection from JMRI to a Base Station with an Ethernet or WiFi
Shield.
- DCC++ Over TCP: Remote network connection to a local JMRI instance connected to a Base
Station
Simulator
To use the Simulator, simply choose that option in the JMRI Preferences. Note that some
features do not work in the Simulator. For example, the Simulator does not (yet) support
assigning, storing, and remembering Sensor and Turnout assignments. The Simulator interface
is functional enough to keep JMRI "happy" while working on offline projects such as
Operations or Panel and Logix design, but is not intended to be a full-fledged Base Station
Emulator.
DCC++ Over TCP
For the DCC++ Over TCP, a host computer must be connected to the Base Station over a
Serial or Network connection (or a simulator). This host computer then runs the DCC++ Over
TCP Server. A remote computer (or several remote computers) can then use the DCC++ Over TCP
(Server) interface to remotely access and control the Base Station.
Limitations
- JMRI
-
JMRI currently supports the V1.1 Base Station Interface. Some V1.0 commands may not
work.
Connecting
Configuring an Arduino for use as a DCC++ Base Station
In order to use an Arduino as a Base Station, you must first assemble the device and
download the Base Station firmware to it. Please follow the instructional videos linked below under Other Info.
Connecting to a DCC++ Base Station via USB
- To connect your computer to a DCC++ Base Station, first install the appropriate
drivers.
-
- For the DCC++ Base Station with JMRI, you may need to install a device driver on
your computer. Please refer to the
Arduino Getting Started pages for instructions.
-
Windows (See Step
4)
- Mac: No drivers should be required
-
Linux
page
Note: If you have already installed the Arduino IDE software, the
device drivers should already be installed.
When the device drivers are installed, connect the Arduino Base Station to your
computer using a standard USB cable.
- Once the drivers are installed, you are ready to configure JMRI. Start one of the
JMRI-based programs, Then go to the preferences panel. This opens automatically the first
time a program is run, or you can select it from the "Edit" menu.
- Select "DCC++" from the top selection box ("System Manufacturer").
- Select "DCC++ Serial Port" from the second selection box ("System Connection")
- Select the appropriate USB/Serial port from the third selection box ("Serial
Port")
- Click "Save". You'll be asked if it's OK for the program to quit, click "Yes".
- Restart the program. You should be up and running.
Connecting to a DCC++ System using Network
- First, connect the DCC++ Base Station to wired or WiFi network and record the IP
Address and Port number. You may need to connect the Arduino to a host computer temporarily
and use the Arduino Serial Monitor to get this information.
- Now you are ready to configure JMRI. Start one of the JMRI-based programs, then go to
the Preferences panel. This opens automatically the first time a JMRI program is run, or
you can select it from the "Edit" menu (from the Application menu on OS X).
- Select "DCC++" from the top selection box ("System Manufacturer").
- Select "DCC++ Ethernet" from the second selection box ("System Connection").
- Input the IP Address and Port Number of the DCC++ Base Station.
- Click "Save". You'll be asked if it's OK for the program to quit, click "Yes".
- Restart the program. You should be up and running.
Connecting to a DCC++ System using DCC++ Over TCP
- First, connect the DCC++ Base Station to the host computer via the Serial or Network
interface as described above.
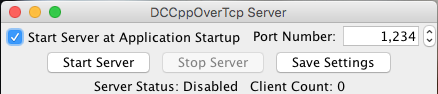
- On the host computer select "Load DCC++ Over TCP Server" from the DCC++ Menu. Check the
settings, then press the "Start Server" button. If you want the server to automatically
start when JMRI is launched, click the checkbox provided.
- The Host computer must be running with the DCC++ Server active before launching the
Client computer.
- On the client computer, launch JMRI on the Client computer.
- In the Connection Preferences, select DCC++ as the System Manufacturer.
- Select "DCC++ Server" as the System Connection Type.
- Enter the network name or IP address of the host computer and verify that the port
number is the same as on the host computer.
- Save your Preferences and restart.
Once both the Host and Client instances of JMRI are configured, you can use the Client
JMRI just the same as if it were directly connected to the Base Station. The client JMRI
instance can be on the same computer, in the same house, or across the country from the
host.
Connecting to the DCC++ Simulator
- Start one of the JMRI-based programs, Then go to the preferences panel. This opens
automatically the first time a program is run, or you can select it from the "Edit"
menu.
- Select "DCC++ Simulator" from the top selection box. There are no additional
configuration steps required to use the DCC++ Simulator.
- Click "Save". You'll be asked if it's OK for the program to quit, click "Yes".
- Restart the program. You should be up and running.
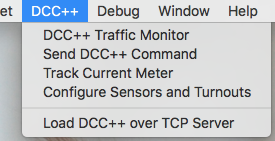
The DCC++ menu contains 5 tools:
- DCC++ Traffic Monitor
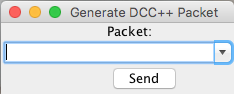
- Send DCC++ Command
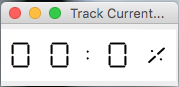
- Track Current Meter
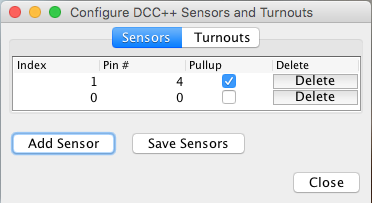
- Configure Sensors and Turnouts
- Load DCC++ over TCP Server
Documentation
JMRI Help
Additional documentation will be provided on other pages linked here:
Third Party info
For more information on how to construct and program a DCC++ Base Station, refer to the
following: