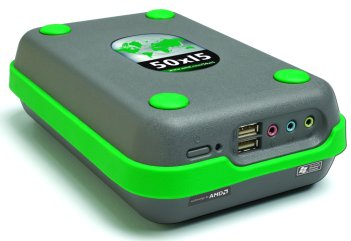
 The decTOP is a "small form factor computer" (SFF)
that provides a complete system in a small, low-cost, rugged box.
The decTOP is a "small form factor computer" (SFF)
that provides a complete system in a small, low-cost, rugged box.
The goal of our project is to see if it would make a good JMRI layout controller, suitable for e.g. driving a couple modules or a medium size layout.
As an example, imagine a large modular layout at a show. A number of clubs bring their modules together to create the overall layout. A common LocoNet backbone can be shared by all, but the addresses of devices on individual modules have to be carefully managed. It doesn't work if both the Northville and Southville clubs bring modules that are configured to use address 120.
If sufficiently low cost & reliable hardware was available,
JMRI could resolve this,
without having to manage huge numbers of addresses or reconfigure lots of hardware.
Each club could put a small computer running a JMRI application as the gateway
between the common LocoNet (LayoutNet) and a LocoNet that only runs to
their modules (LocalNet). JMRI would then translate addresses as
LocoNet messages move back and forth, so that address 120 on each of the LocalNet modular
sections becomes 220 and 430 on the global LayoutNet. At the same time, JMRI could continue
to provide local control panes, signaling and automation, and all the other things.
All we need to make something like this work is sufficiently cheap and robust hardware, that can make two layout connections.
The decTop small form-factor computer seems to meet the cheap and rugged criteria, and seems to have enough horsepower:
 You can get one for
about $99 (plus an exorbitant $40 for reasonable-speed shipping)
from the
Data Evolution online store
(February 2008).
It comes with a USB mouse, USB keyboard (poor) and the Ethernet adapter.
You also need to
provide your own monitor and either a USB CD drive or USB flash drive
for use during (at least) setup.
You can get one for
about $99 (plus an exorbitant $40 for reasonable-speed shipping)
from the
Data Evolution online store
(February 2008).
It comes with a USB mouse, USB keyboard (poor) and the Ethernet adapter.
You also need to
provide your own monitor and either a USB CD drive or USB flash drive
for use during (at least) setup.
You'll also need USB adapter(s) to connect to your layout. There are four USB ports available for use with a LocoBuffer USB, LI-USB or USB-to-Serial adapter. Note that normally three of those ports are used for the keyboard, mouse and Ethernet adapter, leaving one available for a layout connection.
The decTOP was previously known as the "AMD PIC". More information is available under that name.
Those instructions describe using Linux to create the bootable USB stick that's used to load the decTOP. There are similar instructions for Windows. We're actually using a MacBook Pro and VMWare, which in turn provided a Xubuntu 7.10 machine for creating the USB stick. There are some more details on that at the end of this page.
You'll also need an Ethernet connection with DHCP to connect the initialized machine to the Internet to download updates. Make sure it's plugged in and active!
When asked if you want to "detect keyboard", say "No", because the selection process takes forever. After saying no, select "US" twice (with one the included keyboard), and you'll be all set.
When asked for a network name, give it something simple and unique. We used "decTOP".
When asked to partition disks, select the second option, all files in one partition, then select "yes" for the next options
When asked to create a user account, we used:
User long name: JMRI User
Short name: jmri
Pwd: jmripwd
Do the kernel install as described in the instructions. This requires network access via the Ethernet adapter, which you connected above.
There was a LONG delay at "Configuring language-pack-en-base 1%". Just wait for it to complete.
When asked what to install, just select Xubuntu desktop.
At this point, you should be able to just reboot into single user mode to continue the install. In our case, our LCD display came up full of pretty colors. The decTOP video setup is a little fussy, and doesn't always come up exactly right with LCD panels. See our page on video problems for more info. In our case, we just attached a borrowed CRT monitor and it came right up, though slowly.
Once Linux was up and running, we logged on with the account created earlier. Everything seemed to work.
To get the LCD monitor working, we created a setting with the right resolution and frame rate in the "Screens and Graphics" settings, then selected it in the "Display Settings" (both in the "Applications" - "Settings" menu). Once that was done, we could plug the LCD monitor back in and it worked fine.
Pull down "Applications" at the top left of the screen, then "System", then "Synaptic Package Manager".
Click "Search", enter "sun-java" into the search box to find the SDK package, and then install it. It will bring along a couple other packages too.
Downloading and installing JMRI 2.1.3 went OK. We did some simple tests with the "LocoNet Simulator" preference setting at this point. Startup was very slow, about 35 seconds from click to display of the main window, but the program seemed fast enough once it was running.
The install location was "/usr/lib/jvm/java-6-sun-1.6.0.03".
We did have to make a minor edit to the DecoderPro startup scripts, but that change will be available by default in JMRI 2.1.4.
As a general purpose computer, however, it's very slow. More memory would likely help.
Instructions to install Xubuntu 7.10, recommends 256MB RAM for Ubuntu or Kubuntu. (Earlier 7.04 install guide)
The Linux version used was the Ubuntu appliance from http://bagside.com/bagvapp/ (Alternately, download and install the "Xubuntu 7.10 Tribe 2" VMWare appliance from that same location; it's a little smaller and faster)
USB devices connect to the VMware machine if it has focus when the flash drive is plugged in. Make sure VMware is at the front on your screen before plugging it in. In our case, it mounted as /media/KINGSTON, specifically:
/etc/mtab:/dev/sdb1 /media/KINGSTON vfat rw,nosuid,nodev,shortname=mixed,uid=1000,utf8,umask=077,usefree 0 0
After that, the process just went through as described in the Linux instructions.
More on Java distributions for Linux.