To select the icon, click the "Change Icon..." button to pop an icon editor panel.
The current icon is shown at the top. To change it, use the tree in the bottom of the window
to select a new one, then click on the icon at the top of the icon editor panel to load the
selected icon. This is a general mechanism: Any icon on an icon editor window can be replaced
by selecting the desired new one and clicking on the icon to be replaced.
The JMRI library contains lots of user contributed icons for representing CTC panels, LEDs, etc. You can browse through them with the tree in the bottom of the editor frame. Perhaps the best way to see what each looks like is to select it in the tree, then click on the icon next to the "Add icon" button. That will load it.
You can also create your own icons and use them by selecting from the "file" section.
For little bits of track, e.g. to connect turnouts, you might want
resources -> icons -> small schematics ->tracksegmentsthen block.gif, etc.
We do need to do a better job of organizing the available icons!
There's also a pop-up menu (ctrl-click on a Mac) that will provide various ways to manipulate the icon. It will let you rotate the icon so that it points in whatever direction you want. Text labels can have their font, size and color changed. You can also remove icons from the panel with the popup menu.
MemoryIcon objects work two ways: If a series of icons is defined in the file, the memory contents will be translated via this table (this was the original behavior). If there aren't any icons defined, the memory contents is displayed directly, as a string if it's a String and as a NamedIcon if it's a NamedIcon.
See xml/samples/MemoryIconExample.xml for info on how to set this up.
 The first implementation of Reporter is Digitrax transponding. By
adding the appropriate elements to your Panel files, you can show decoder ID information on
your Panels.
The first implementation of Reporter is Digitrax transponding. By
adding the appropriate elements to your Panel files, you can show decoder ID information on
your Panels.
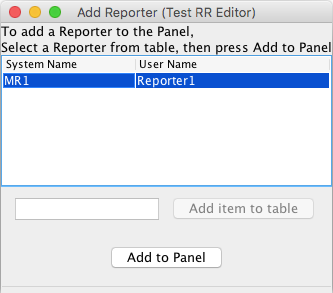
A Reporter's value can be displayed on a Panel via an icon. To do this:
See xml/samples/ReporterIconExample.xml for info on how to set this code up by hand.
Look in the "xml/samples" directory within JMRI for a file called "ReporterIconExample.xml".
(It's also available on the web but many browsers will try to interpret it instead of showing you the text; your browser's "View Source" option might help with that)
You'll see this line:
<reportericon reporter="LR12" x="10" y="10" class="jmri.jmrit.display.configurexml.ReporterIconXml"/>
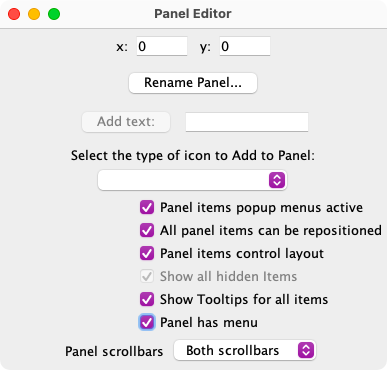
The "x" and "y" define where you want it on your panel. The "LR12" is the name of the reporter object, e.g. the name of the one you saw changing when you were looking at the table.
<paneleditor class="jmri.jmrit.display.configurexml.PanelEditorXml"
(The "paneleditor" line starts a new panel. If you have more than one panel in the file, you'll have to look for the panel title to see where to insert the new line)